Let’s be honest
I’ve written a fair bit of material about origami and most of it is focused around origami design. In my Folding Fantasy series I go into detail about one or more aspects of several designs. These are intended to show how to overcome a certain design challenge but the nature of showing by example is that what I actually show is how I overcame a certain design challenge. This change in tense is a subtle but important difference. By only ever showing the successful pieces and finished models, I don’t show the true stories behind my designs: the challenges I haven’t been able to solve, the projects I’ve given up on, and the pile of paper snowballs.
Perhaps this omission is partly (British?) modesty; to make it seem like there is no struggle. I think of how many times I’ve had a conversation along the lines of ‘You must be so patient and clever.’ and I reply ‘I’ve just had years of practice…’. Reflecting more honestly though, it’s an insecurity with putting these failures in public, especially since I’m trying to make a name for myself among many well-known titans in origami design.
So I’m starting a blog to show the real story. Posts will deliberately have a different feel to my writing in books – it’ll be less formal and rather than having info on the technical aspects of design I want to convey the feeling of designing. I won’t put as much effort into my diagrams and photos, because that’s not really what I do when designing. It’s not that my books are lying, but here I want to give an untempered view of my work.
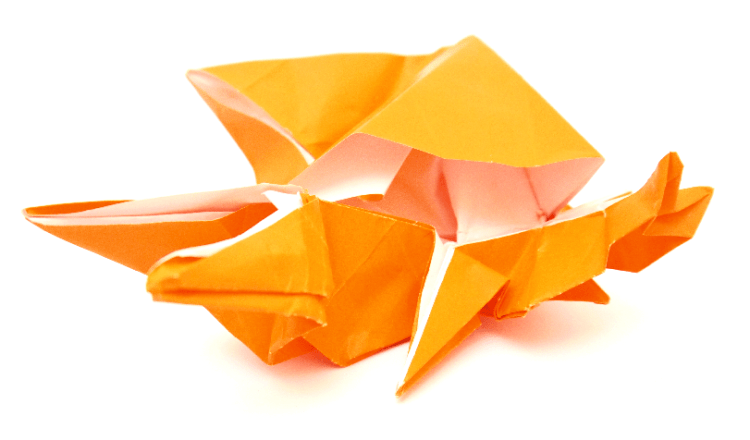
I’ll start with a model that I haven’t yet finished. Here it is:
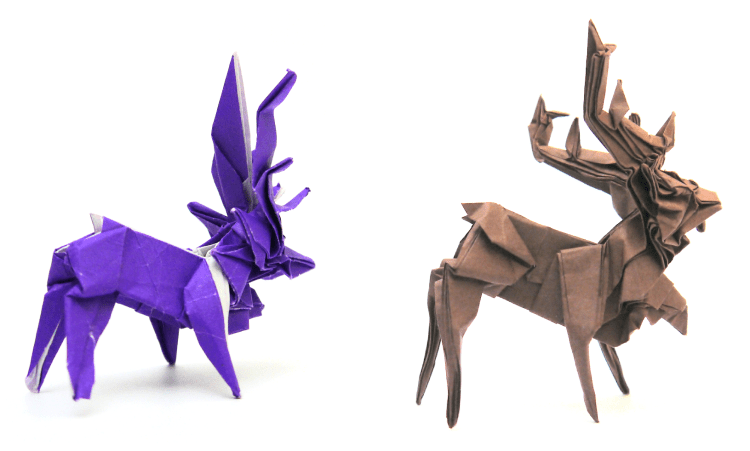
(It’s a Reindeer if you couldn’t tell, but I’ll award half marks if you thought ‘Elk’ or ‘Moose’). Ok, I’ll admit I’ve shown two models. If I’m being precise, it’s the design which is not yet finished. The design goes through iterations and along the creative journey I end up with multiple models (which hopefully improve over time). I generally stop the design process when I’m not embarrassed with the models being produced.
You can think of a factory making a food product which has to reach a threshold of tolerableness before being allowed on supermarket shelves. The design is not the food product, but the factory itself. Part of the fortitude to keep going comes from being able to see the potential for Michelin Star origami even when the current model is a sloppy heap of waste.
Of course, I don’t yet know if that potential will be fulfilled with this model which is sort of the point I’m getting at (through long-winded metaphors in areas which I know nothing about).
Oh Deer
There are a variety of antlered creatures with similar body structures, and no shortage of origami depictions for them. I’ve definitely folded Lang’s Bull Moose, and a couple of different Deer designs by John Montroll. Thankfully these were all at least a decade ago and I can’t remember these designs. It’s critical that I resist the urge to look at any of existing designs or I’m not giving myself the opportunity to be as creative as possible.
So where to start? I usually refer to an image of the subject if there is one. For example, see https://en.wikipedia.org/wiki/Reindeer. Then panic for a short time because Shuki Kato would already have a crease pattern by this stage in the design process. Then regain composure by thinking about a rough tree for the subject because it’s a safe starting point for almost all animals with a skeleton.

That’ll do. Let’s draw some circles for these flaps within a square (if you have no idea what I’m doing, then there’s some pre-course material at the end of this post). Here are three very rough arrangements (which all use features of the same scale compared to the square size, so are all about as efficient as each other).
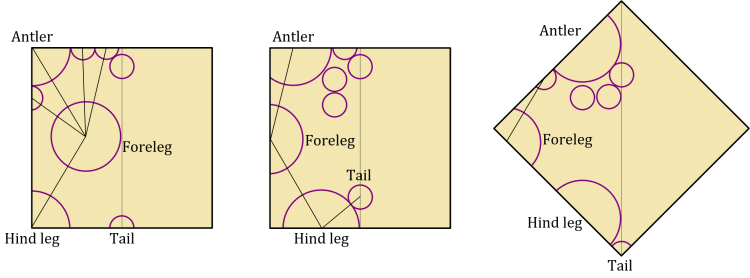
I’ve simplified the antlers a bit, not shown rivers explicitly, and this is only the left half of each arrangement. Nonetheless, this is enough to give a brief summary of the pros and cons for each of them (again, if this doesn’t make sense, that’s ok, there’s some suggested reading at the end of this post):
| First Arrangement | Second Arrangement | Third Arrangement | |
| Pros: | •Details on the antlers are easy to make using radial axial creases from the foreleg •Easy references for the big flaps | •Foreleg and hind leg will be the same thickness (both edge flaps) •We have lots of wiggle room for the antler flaps – the above image just shows one option | •The Foreleg and hind leg will be the same thickness (both of these are edge flaps) |
| Cons: | •Foreleg (middle flap) and hind leg (corner flap) are will be very different thicknesses | •We’ll need to add flaps in the centre of the paper to fill the big gap in the centre | •We’ll need to add flaps in the centre of the paper to fill the big gap in the centre •Those antlers are going to be a pain to fold |
The first arrangement looks best from a quick glance at this list and it’s fairly easy to fold a base for it. One possibility is to have two perpendicular axes. This has the benefit of reducing the required amount of paper between the legs because the shortest path on the square only needs to go up to the belly rather than all the way up to the spine in the folded model. Here’s another couple of photos to given an impression of what the model might look like going with this arrangement.
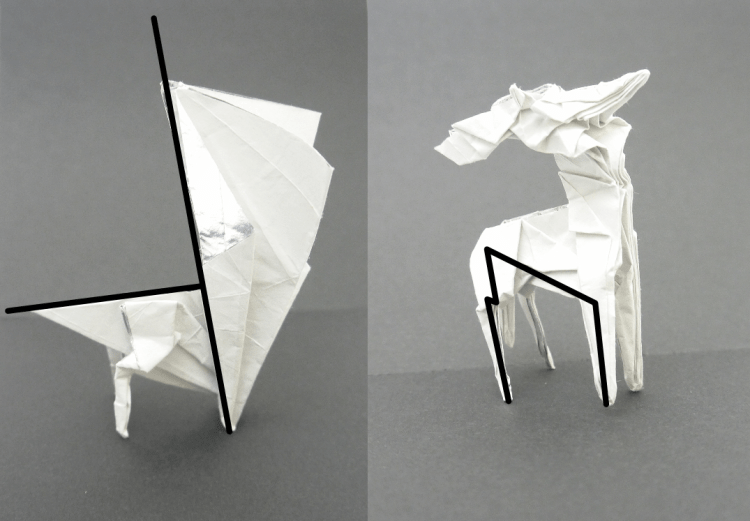
There are a couple of issues with this arrangement. The naïve arrangement was deliberately rushed and there isn’t actually enough room to make well-defined ears. Meanwhile, there’s wasted paper around the tail. The forelegs are surrounded on all sides though, so can’t move to rectify these problems. There’s also no excess paper for the hair hanging on the neck (one of the most distinctive features of a reindeer). Sometimes we can fudge these sorts of details later on, but it turns out it was a mistake to omit this from the initial tree.
Fortunately, the empty regions of paper that appeared to be wasted in the centres of the second and third arrangements are actually ideal for a new ‘neck-hair’ flap. On balance, this now makes the second arrangement seem like the best starting point.
Let’s adjust some of those references before proceeding though. We can make the top section using 22.5-geometry which should make the folding sequence relatively straightforward and allows for some point splits to make more subflaps on the larger antler flaps. If we add rivers and label a few more features we get the arrangement below.
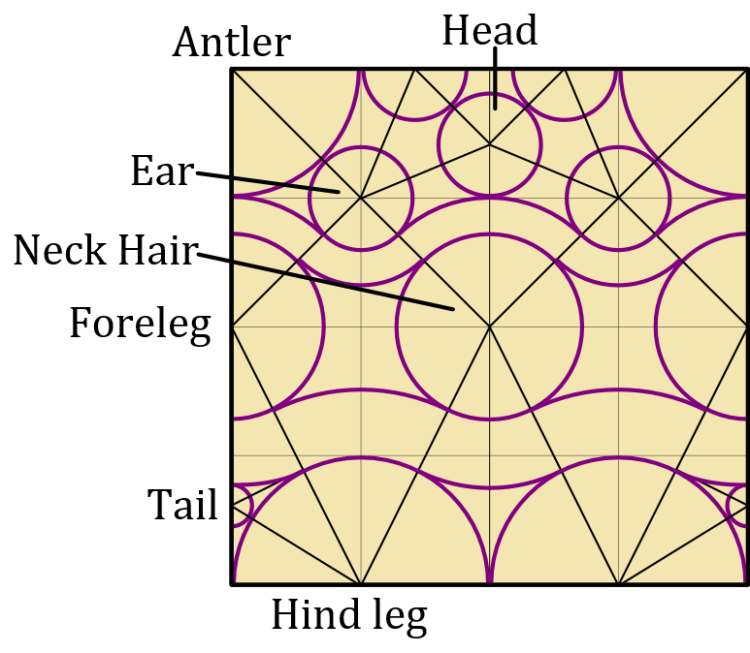
The two tail flaps are unusual, but since Reindeer have bushy tails this is probably fine. You probably want to see what this looks like when folded. Well, here you go:
Beautiful isn’t it? Ok, this was the first version I made to see what folding the base is like and to check for glaring errors. I haven’t put much effort into making it look like an animal. But it’s a good image to show progression over time. I’ve already shown images of the more recent models, and it gives me hope to leave room at the end of this line for a less scruffy reindeer.
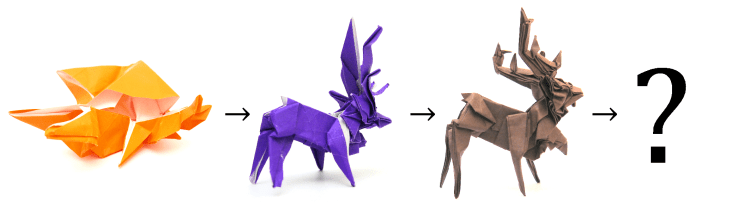
And that’s where I’m at now. It’s trickier than I’d like it to be, so a large part of improvement needs to come from refining the sequence (which might not give any visible improvement in how the actual model looks). The tail looks weird, the head’s very thick and the neck isn’t long enough. If I’m lucky, these anatomical issues can all be fixed by folding more carefully from a larger sheet of paper, but I’ve never been happy with compensating for design problems by spending more time and effort shaping.
I should mention that I’m sure part of this problem is that the more experience I get, the higher my expectations are, and so the more I care about flaws which may not seem that big to you. If you’d be really happy with folding any of the models pictured here, I hope my complaints don’t belittle your own folding achievements.
I’ve called this post ‘Part 1’ which I’m hoping will motivate me to come back to this project in the future. But maybe not. It could be that this Reindeer will gather dust and I’ve got to learn to be fine with having another design that I wasn’t quite happy with. So don’t hold your breath for ‘Part 2’ – it’s sometimes what happens.
Edit: part 2 is here!
Reading material
For any origami design questions, make sure you’ve read this: https://langorigami.com/publication/origami-design-secrets-2nd-edition/
(Yeah, that’s my only recommendation here because it’s just that good.)
2 responses to “Reindeer Part 1”
-
Thanks for the blog. Your analogies are eye opening, and I appreciated seeing the folded base (naturally something I have not seen in yours or anyone else’s books). Good luck reaching a final Reindeer design, and I look forward to a possible part 2 to the blog.
-
Thanks Edward, I’ll definitely show instructions (either video or diagrams) for free here when I get round to finishing it!
-
2 thoughts on “Reindeer Part 1”
-
Thanks for the blog. Your analogies are eye opening, and I appreciated seeing the folded base (naturally something I have not seen in yours or anyone else’s books). Good luck reaching a final Reindeer design, and I look forward to a possible part 2 to the blog.
-
Thanks Edward, I’ll definitely show instructions (either video or diagrams) for free here when I get round to finishing it!
-
Leave a Reply