Returning to the fold
In this blog post from early 2024, I left a reindeer design unfinished. Part of the point of the discussion was about learning to be ok with having an incomplete design, and perhaps I achieved that a little too well: I didn’t think about it at all, and now it’s been a long time since my previous blog post!
In 2025, instead of designing new models, I’ve focussed more on refining previous projects, such as refolding the Vampire and Chimera from Folding Fantasy: Volume 1. The Reindeer is another obvious candidate for this folding renaissance.

Recap
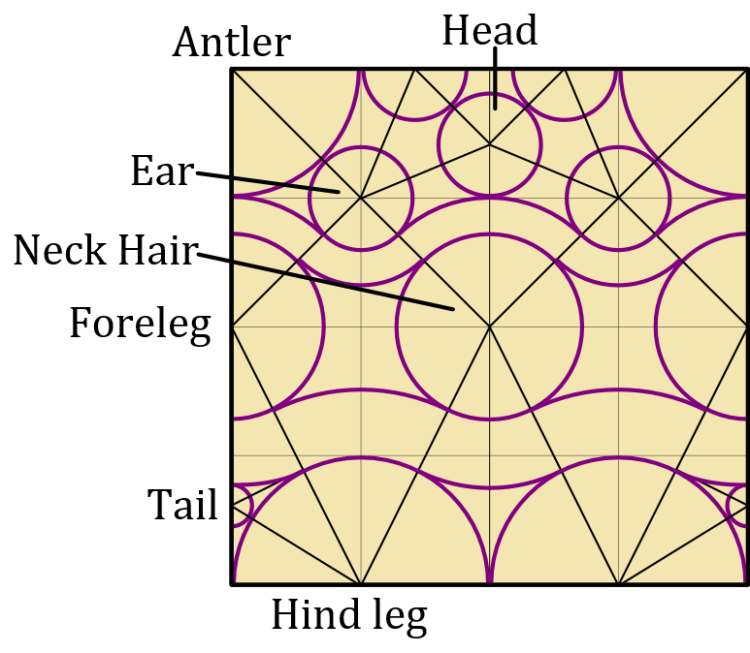
As a reminder (as much to myself as anyone else), we had a relatively complete crease pattern for a Reindeer, and the main area to work on was the folding sequence.
Or so I had thought. It’s so easy with creative endeavours to think you are close to the end, only to find an unforeseen avenue which takes longer to pursue than all previous work on the project. I’ve learnt and forgotten this lesson several times before, of course.
On refolding the model, we find several other problems (besides the lack of a good sequence):
1) The head flap is too big
2) The ears are too long
3) The tail coming from two separate flaps feels clunky
4) There’s generally too much paper in the front half of the model (which is not only an efficiency issue but could bring the centre of gravity too far forward, causing the model to tip over)
The first two points are as much down to artistic style as anything else – origami is never truly realistic, so there’s a compromise to be made, and there’s nothing wrong with a bit of exaggeration to make a chibi-style model. Right now though, I’d rather have a more realistic result.
The third point is harder to defend, but it’s worth analysing my past thoughts to see how this happened. It’s impossible to know exactly what I was thinking, but I suspect the main reason I previously designed the tail to come from the bottom raw corners was to avoid ‘wasting’ the large triangles at the bottom raw corners. I can say now that this isn’t a good reason to do things in origami in general – using paper suboptimally may be better than not using it at all, but by definition, it’s not as good as the best solution! In this case, sure, it works to use the corners for tail flaps, but it just doesn’t work as well as a central tail. I’m not convinced by my past justification about making the tail look bushy either.
The fourth point seems like the biggest problem – if flaps need relocating, then we have to redo much of the work in making the arrangement. However, we have a cunning fix – we’re going to use colour changes to address this issue. In fact, we can use it to fix each of these issues. This is really interesting in hindsight because I didn’t mention colour changes at all in the previous post, even though most of my recent designs use them, so it should have been obvious (or perhaps it was obvious and I’m just a simpleton; you decide).
Let’s take a look at how to do this.
Glorious colour
We’ll start by looking at the previous Reindeer. The neck hair and the ears are both the same colour, and they are both internal flaps, so they cannot (practicably) change colour. On a real reindeer, the ears are typically a dark brown, while the neck hair is white – they are the two features which have perhaps the most colour contrast! This means any attempts for other colour changes are destined to fail – there’s little point in having other flaps be different colours if we are unable to have colour changes between the features with the most contrast! This is why the previous photos are all mono coloured.
You can just see the white colour of the kami along the back of the purple Reindeer and also some other flaps. The white is the upper colour (it is an open-backed design), and the purple is the lower colour. The intention is that the lower colour is brown and the upper colour is hidden.
However, most regions do have the potential for a colour change. Specifically, the large and small antler flaps are along the raw edge, and the entire region with the torso, forelegs and hind legs together, is near an unused raw corner, though this latter region would be easier to use if the tail flaps were in a different place.
For clarity, let’s make a table to indicate the current features and their colours (noting that the tail would be better in a new location).
We need the lower left and upper right boxes in the table to be empty. The closest we can get is by changing the colour of the antler flaps and tail – this only leaves one flap with the incorrect colour.
An asterisk (*) indicates flaps which can change colour.
| Lower colour (brown) in current plan | Upper colour (white) in current plan | |
| Should be brown in final model | Head Ear Foreleg* Torso* Hind leg* | |
| Should be white in final model | Neck hair | Small antler* Large antler* Tail?* |
It looks like the neck hair is the problem flap, so it’s tempting to try a nasty sink to reverse the colour (or perhaps just give up on a colour change). Remember, though, that the issue is actually that the neck hair is the same colour as the ear. So it would be equally worth trying to adjust the ear. At this point, we might spot that the small antler and ear flaps are the same size. What happens if we swap them over? Unfortunately, it appears to make things worse, because now the small antler has to be the lower colour (brown), when it should be white. We’ll make a second swap to address this – let’s swap the lower and upper colours so every flap is inverted.

| Upper colour (brown) in current plan | Lower colour (white) in current plan | |
| Should be brown in final model | Ear* Foreleg* Torso* Hind leg* | Head |
| Should be white in final model | Neck hair Small antler* Large antler* Tail?* |
It was a nice idea, but this doesn’t seem to have helped because now the head is the wrong colour. Or is it? The reason the head couldn’t have a colour change before was because it was so close to the small antlers and couldn’t be independently changed. But having swapped the small antlers and ears, there’s no problem with treating the whole section with the ears and head as one larger flap and changing their colours together. By having these flaps closer, we have the option to add a new small flap halfway between them, which is the perfect place for an eye. This reduces the size of the head and ear, which we wanted to do anyway!

While making changes in this section of the paper, we notice that there is some space to add small flaps for spikes along the small antler. For now, let’s just put some circles in the space between the small antler and head to show this, though this is not an exact depiction of the flaps.
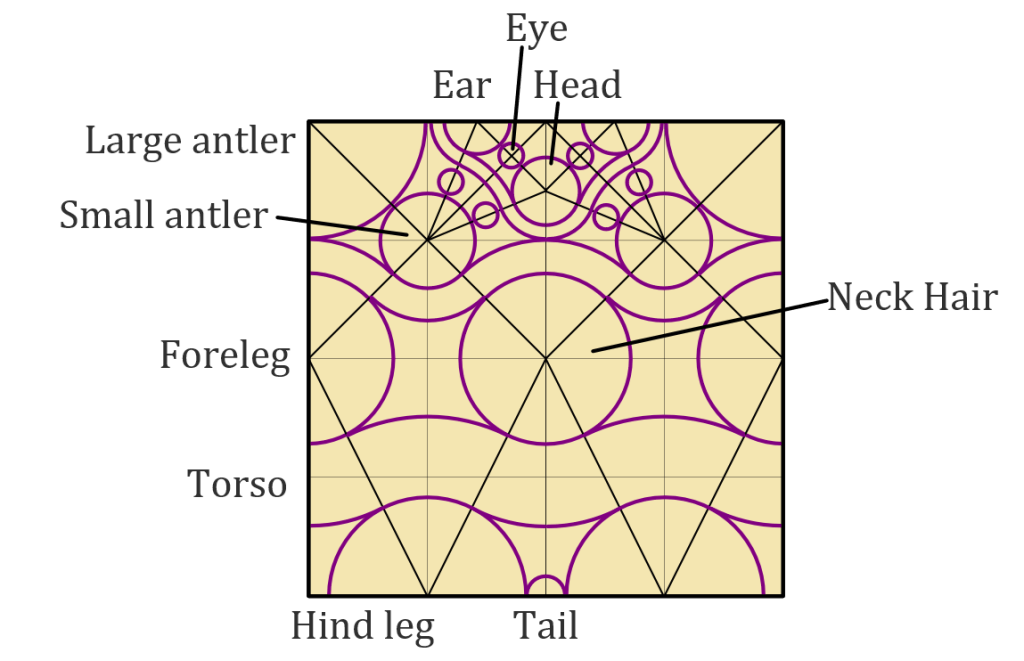
Finally, let’s look at the tail. We noted earlier that the torso/leg colour change would be easier if the tail moved elsewhere, and the natural new placement is between the hind legs. This simultaneously reduces the length of the hind legs and increases the length of the torso. All things considered, this gives slightly more realistic proportions. A longer torso also helps the model to balance better than before (unsurprisingly, more
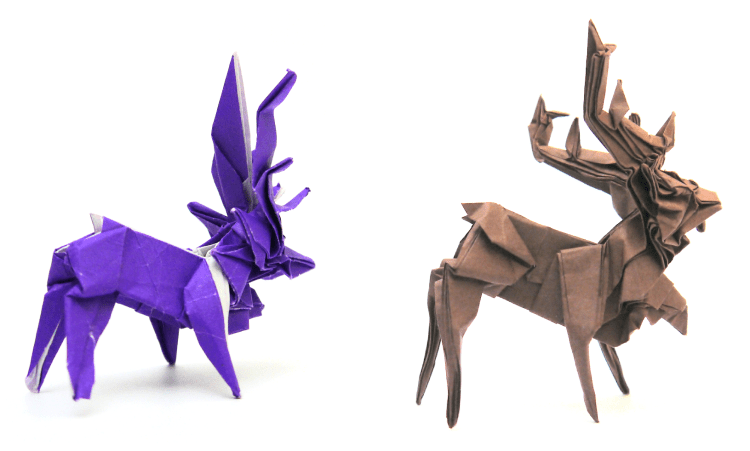
Here’s a test fold and final display version of the reindeer.

It’s worth noting that swapping the lower and upper colours gives the white underbelly and means we don’t have any potential for a white seam along the top of the model. This is worth noting for a large number of mammals – if there is a colour difference between the back and belly, then almost always, the back is darker and the belly is lighter. This suggests that to make colour changes more manageable, the upper colour of an origami model should be the darker colour by default.
When I’ve prepared a proper crease pattern, I’ll include that in part 3 of this Reindeer blog. For a challenge, have a go at creating your own Reindeer before that using the crease pattern above (I hope you can see that I’m not being mean by deliberately withholding this; folding from a plan like this is what I do, after all!).
Leave a Reply